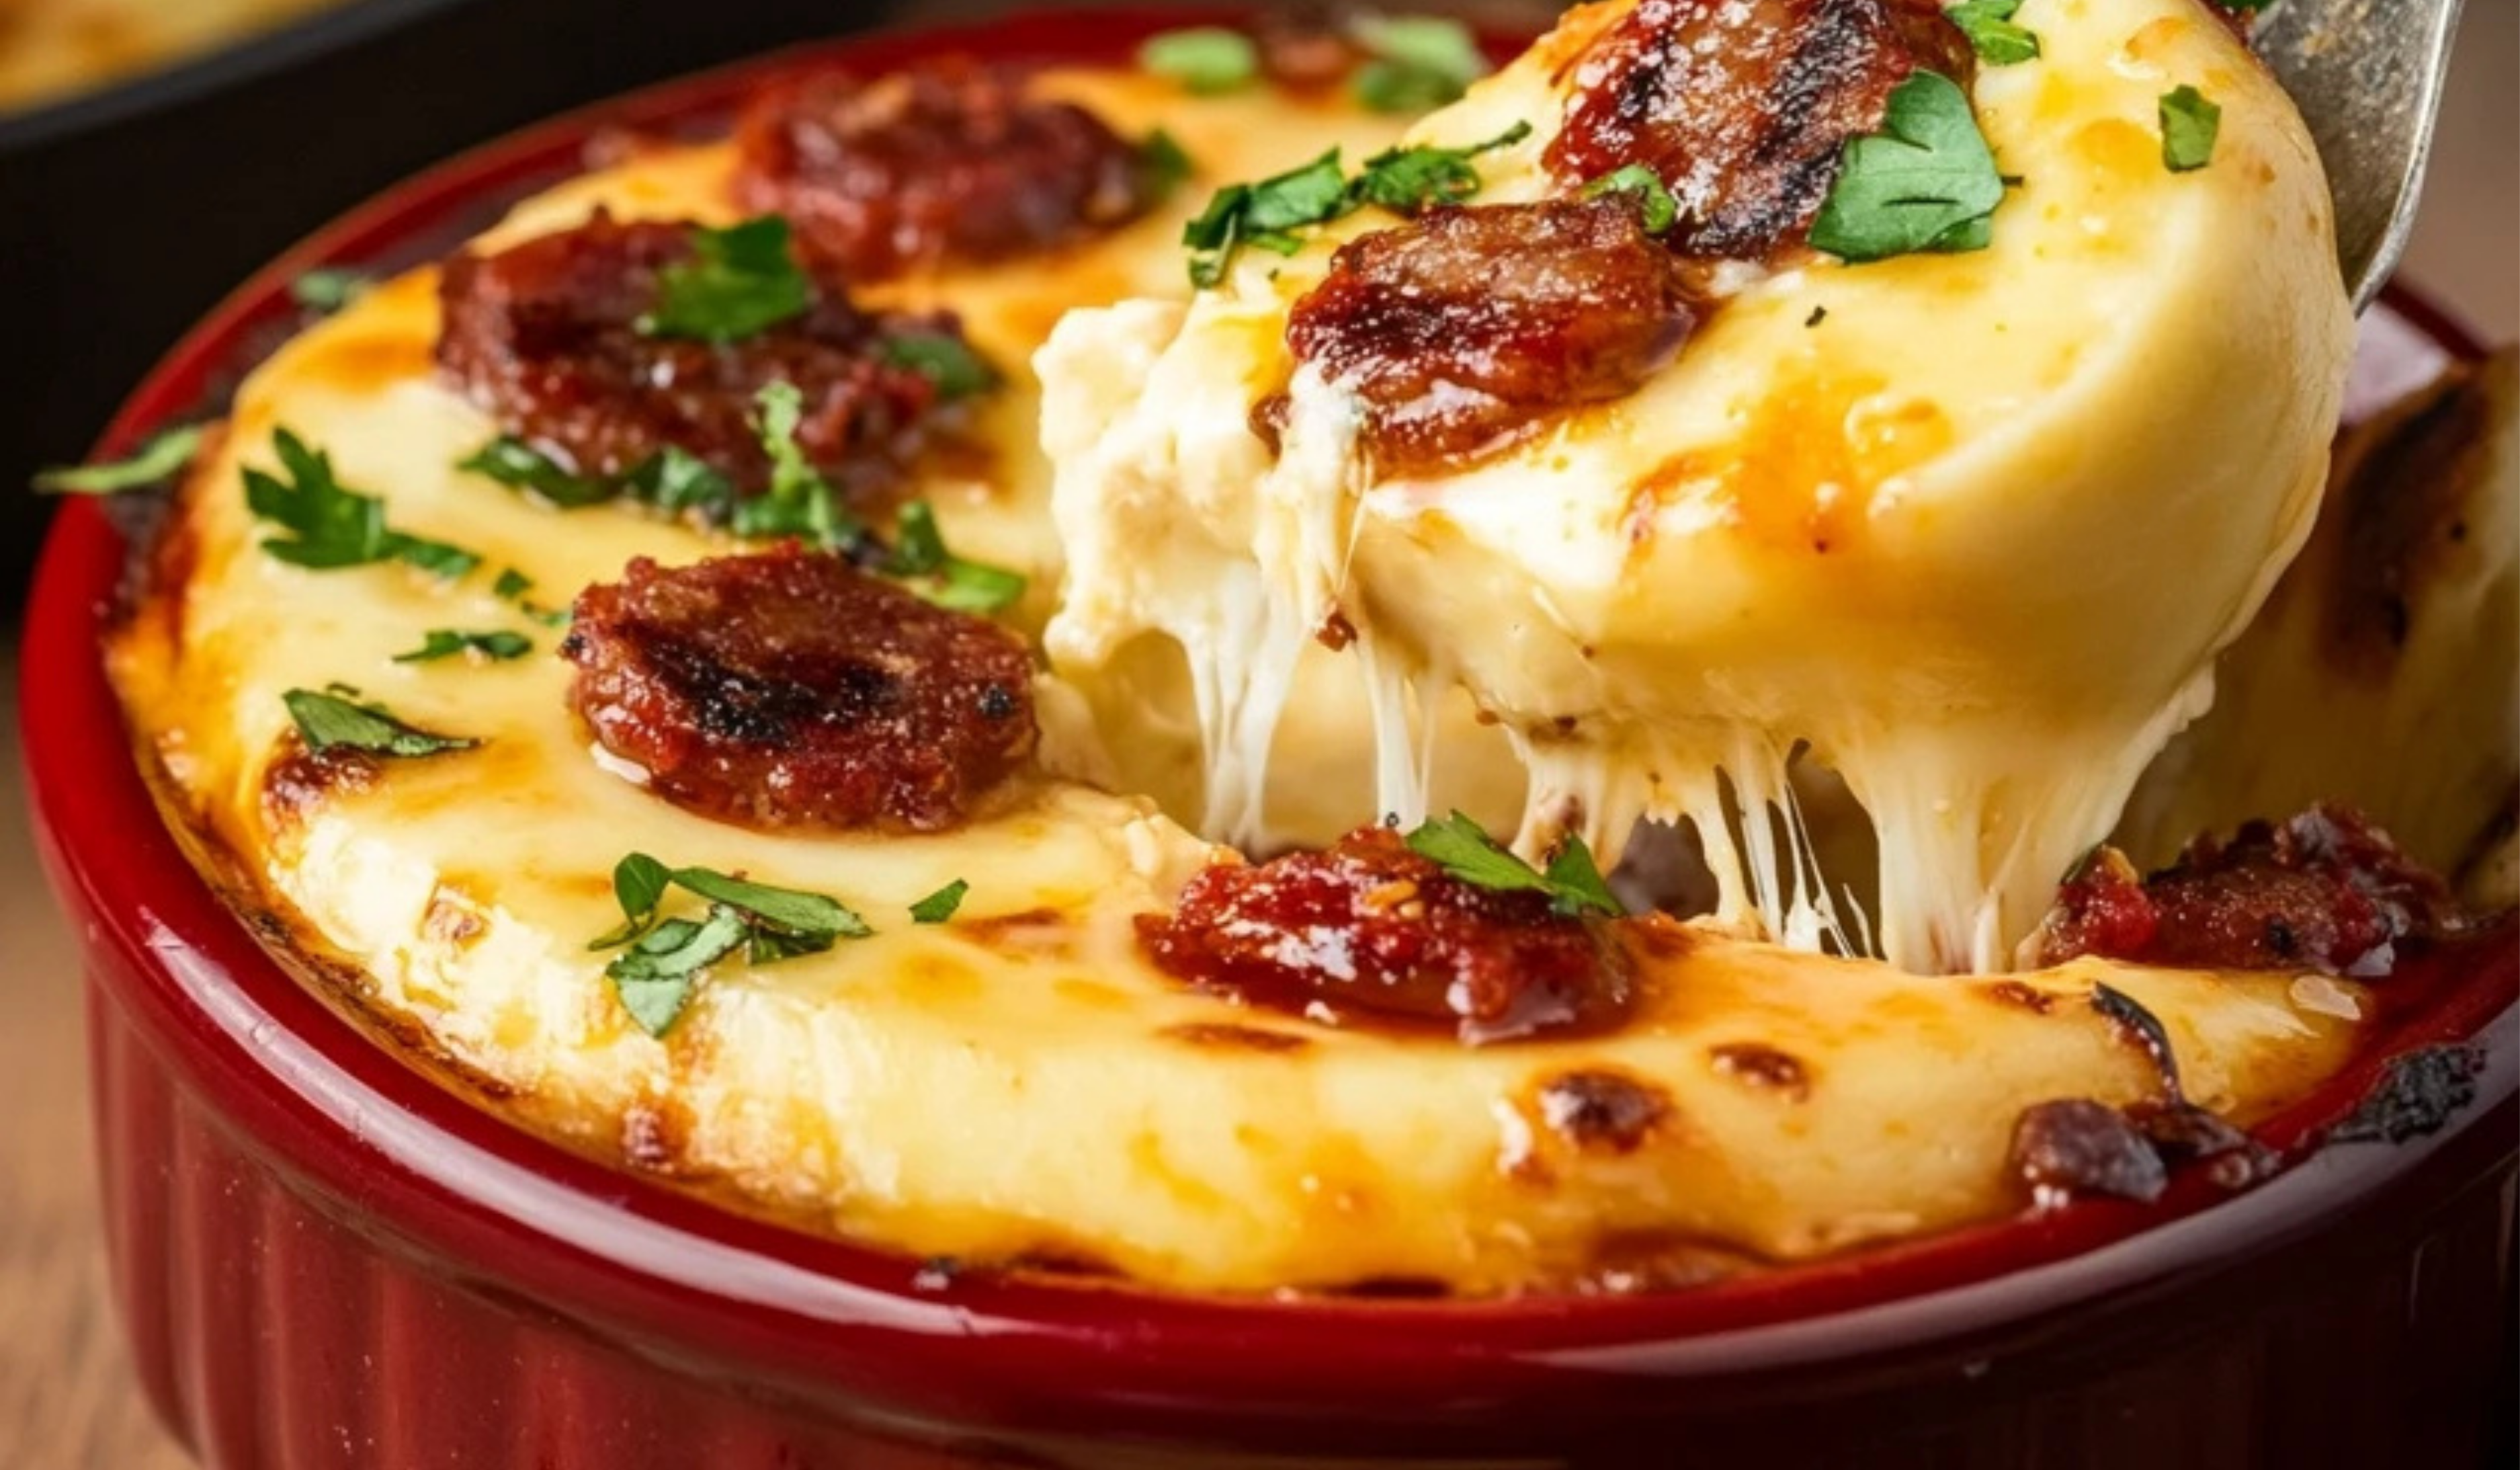
Queso Flameado: A Beginner-Friendly, Flavor-Packed Cheese Dip
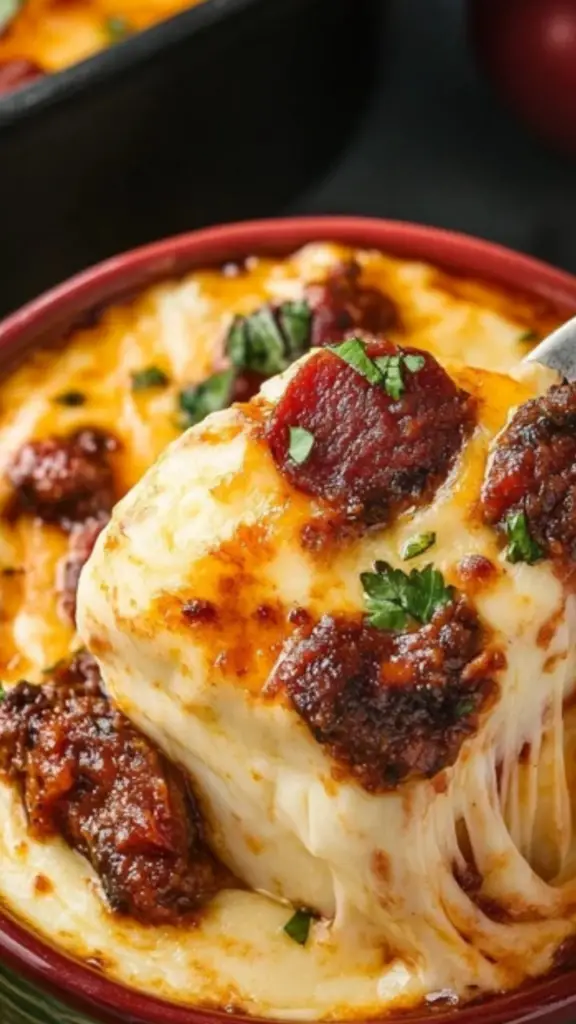
Queso flameado is a dish that brings warmth and comfort to any gathering. With its rich, melted cheese and flavorful seasoned beef or chicken, this Tex-Mex favorite is simple yet incredibly satisfying. The first time I made queso flameado, I was surprised at how quickly it came together. In just under 30 minutes, I had a bubbling skillet of cheesy goodness, perfect for scooping up with warm tortillas or crispy chips.
PrintQueso Flameado: A Beginner-Friendly, Flavor-Packed Cheese Dip

Queso Flameado is the ultimate melty cheese dip, loaded with bold flavors and perfect for scooping up with warm tortillas or crispy chips. This beginner-friendly recipe delivers a restaurant-quality appetizer right from your kitchen! 🧀🔥🌮
- Prep Time: 5 minutes
- Cook Time: 20 minutes
- Total Time: 25 minutes
- Yield: 6 servings 1x
Ingredients
- 1 pound ground beef or diced chicken
- 16 ounces shredded Chihuahua cheese (or Oaxaca, Monterey Jack, or mozzarella)
- 1 tablespoon fresh cilantro, chopped
- 1 teaspoon chili powder (optional, for added spice)
- ½ teaspoon cumin
- ½ teaspoon smoked paprika
- 1 tablespoon olive oil (if using chicken)
- Optional sides: warm flour tortillas, tortilla chips, salsa, guacamole
Instructions
Step 1: Cook the Meat
Heat a large oven-safe skillet over medium heat. If using beef, cook it directly in the pan, breaking it into small crumbles with a wooden spoon. If using chicken, heat one tablespoon of olive oil before adding the diced pieces. Cook the meat for about 5–7 minutes, or until fully browned and cooked through. Drain excess grease, leaving a small amount to retain moisture and flavor.
Step 2: Layer the Cheese
Spread the cooked meat evenly across the bottom of the skillet. Reserve a small portion to sprinkle on top before serving.
Evenly distribute the shredded cheese over the meat, ensuring complete coverage.
Step 3: Bake the Queso Flameado
Transfer the skillet to the preheated oven and bake for 10–12 minutes, or until the cheese is completely melted and bubbling.
Step 4: Optional Broiling for a Golden Top
For an extra layer of texture, turn the oven to broil and cook for an additional 1–2 minutes. This helps create a slightly golden, bubbly top, but watch closely to prevent burning.
Step 5: Garnish and Serve
Remove the skillet from the oven and sprinkle the reserved meat and chopped cilantro over the top.
Serve immediately with warm flour tortillas, tortilla chips, salsa, or guacamole on the side.
Notes
How to Tell When the Dish is Ready
The cheese should be fully melted and slightly bubbling around the edges. If broiling, the top should be lightly golden but not burnt.
What to Do If the Cheese Becomes Too Thick
If the cheese hardens too quickly, reheat it in the oven for a few minutes before serving. Keeping the skillet on a warming plate can also help maintain its gooey texture.
How to Keep the Dish Warm for Longer
A cast iron skillet retains heat well, but for extended serving times, place it over a low-heat burner or use a warming tray.
Avoiding Excess Grease
If using beef, draining excess fat before adding cheese prevents the dish from becoming too oily.
Best Way to Shred Cheese for Melting
Shredding cheese from a block results in better melting compared to pre-shredded cheese, which contains anti-clumping agents that can affect texture.
This dish is ideal for beginners because it requires minimal ingredients and straightforward techniques. Unlike complicated recipes that involve precise timing and advanced skills, queso flameado is forgiving and easy to customize. The key to success lies in choosing a cheese that melts well and pairing it with a well-seasoned protein to add depth of flavor. Whether preparing it for a casual dinner, game night, or a special occasion, this dish is a guaranteed crowd-pleaser.
One of the best things about queso flameado is its adaptability. While the traditional version often includes chorizo, this recipe replaces it with seasoned beef or chicken, making it accessible to those who prefer alternatives to pork. The recipe also allows for easy customization by adding spices, toppings, or even a smoky finish from broiling.
This dish is best enjoyed straight from the skillet while the cheese is hot and gooey, making it a fun and interactive meal. Whether you are new to cooking or looking for a reliable, easy-to-make appetizer, queso flameado is a fantastic choice that will quickly become a favorite in your recipe collection.
Ingredients and Preparation
Ingredients
- 1 pound ground beef or diced chicken
- 16 ounces shredded Chihuahua cheese (or Oaxaca, Monterey Jack, or mozzarella)
- 1 tablespoon fresh cilantro, chopped
- 1 teaspoon chili powder (optional, for added spice)
- ½ teaspoon cumin
- ½ teaspoon smoked paprika
- 1 tablespoon olive oil (if using chicken)
- Optional sides: warm flour tortillas, tortilla chips, salsa, guacamole
Ingredient Substitutions and Variations
- If you enjoy spicy flavors, add diced jalapeños or red pepper flakes to the meat while cooking
- Smoked paprika adds depth, but regular paprika can be used if needed
- A combination of Monterey Jack and mozzarella is a good alternative if Chihuahua or Oaxaca cheese is unavailable
- For a vegetarian version, replace the meat with sautéed mushrooms or crumbled plant-based sausage
Preparation Steps
Shred the cheese if it is not pre-shredded. Freshly grated cheese melts better than pre-packaged shredded cheese, which often contains anti-caking agents that can affect texture.
Season the beef with chili powder, cumin, and smoked paprika before cooking. If using chicken, dice it into small, bite-sized pieces and coat it with the same seasoning mix.
Preheat the oven to 375°F (190°C) and set aside an oven-safe skillet, such as cast iron, which retains heat well and keeps the cheese warm after serving.
Step-by-Step Instructions
Step 1: Cook the Meat
Heat a large oven-safe skillet over medium heat. If using beef, cook it directly in the pan, breaking it into small crumbles with a wooden spoon. If using chicken, heat one tablespoon of olive oil before adding the diced pieces. Cook the meat for about 5–7 minutes, or until fully browned and cooked through. Drain excess grease, leaving a small amount to retain moisture and flavor.
Step 2: Layer the Cheese
Spread the cooked meat evenly across the bottom of the skillet. Reserve a small portion to sprinkle on top before serving.
Evenly distribute the shredded cheese over the meat, ensuring complete coverage.
Step 3: Bake the Queso Flameado
Transfer the skillet to the preheated oven and bake for 10–12 minutes, or until the cheese is completely melted and bubbling.
Step 4: Optional Broiling for a Golden Top
For an extra layer of texture, turn the oven to broil and cook for an additional 1–2 minutes. This helps create a slightly golden, bubbly top, but watch closely to prevent burning.
Step 5: Garnish and Serve
Remove the skillet from the oven and sprinkle the reserved meat and chopped cilantro over the top.
Serve immediately with warm flour tortillas, tortilla chips, salsa, or guacamole on the side.
Beginner Tips and Notes
How to Tell When the Dish is Ready
The cheese should be fully melted and slightly bubbling around the edges. If broiling, the top should be lightly golden but not burnt.
What to Do If the Cheese Becomes Too Thick
If the cheese hardens too quickly, reheat it in the oven for a few minutes before serving. Keeping the skillet on a warming plate can also help maintain its gooey texture.
How to Keep the Dish Warm for Longer
A cast iron skillet retains heat well, but for extended serving times, place it over a low-heat burner or use a warming tray.
Avoiding Excess Grease
If using beef, draining excess fat before adding cheese prevents the dish from becoming too oily.
Best Way to Shred Cheese for Melting
Shredding cheese from a block results in better melting compared to pre-shredded cheese, which contains anti-clumping agents that can affect texture.
Serving Suggestions
What to Serve with Queso Flameado
- Flour Tortillas – The classic pairing for scooping up the cheesy mixture
- Tortilla Chips – Adds a crispy contrast to the creamy texture
- Salsa – A fresh, tangy contrast to balance the richness
- Guacamole – A cool and creamy complement
- Grilled Vegetables – Roasted peppers, onions, or mushrooms for added variety
Making It a Full Meal
Queso flameado is typically served as an appetizer, but it can be transformed into a meal by pairing it with grilled chicken or steak fajitas, black beans, and rice.
How to Store Leftovers
Store leftovers in an airtight container in the refrigerator for up to three days. To reheat, place in an oven-safe dish and warm at 300°F (150°C) until melted again. Alternatively, microwave in 30-second intervals, stirring between rounds.
Engagement Features
Encouraging Experimentation
Cooking is about creativity, and queso flameado is an excellent dish to experiment with. Try different proteins, cheeses, or toppings to find your favorite version. Adding garlic powder, cayenne pepper, or a squeeze of lime juice can enhance the flavor profile.
Share Your Experience
Cooking should be a shared experience. If you try this recipe, leave a comment about how it turned out. Did you make any modifications? Did you find a new favorite pairing? Sharing experiences helps others learn and inspires new ideas.
Final Thoughts
Queso flameado is a simple yet impressive dish that delivers bold flavors with minimal effort. Whether preparing it for a gathering, a family meal, or a personal treat, this recipe guarantees satisfaction. The combination of melty cheese, savory beef or chicken, and warm tortillas makes it a must-try for anyone looking for a delicious and easy-to-make dish.
Try this recipe, customize it to your taste, and enjoy the process of creating this Tex-Mex classic.