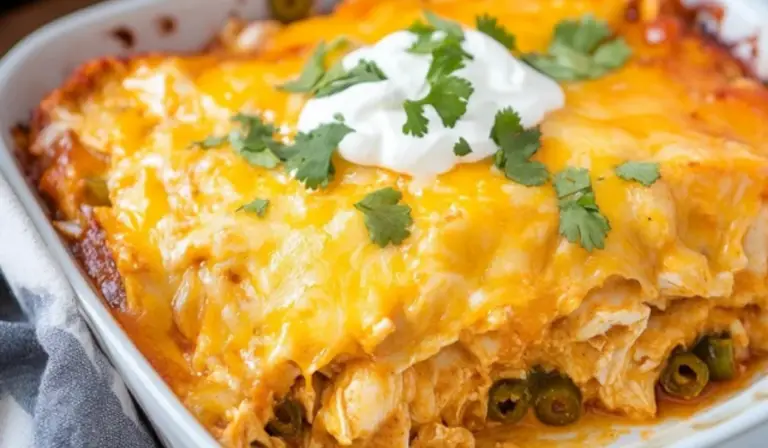
Taco Stuffed Shells: A Flavorful Fusion for Beginner Cooks
When I first moved out on my own, I quickly realized that cooking every night could become overwhelming if I didn’t find recipes that were both satisfying and simple. I wanted meals that didn’t require hours in the kitchen, expensive ingredients, or advanced techniques. One evening, craving the comfort of baked pasta and the bold flavors of taco night, I decided to experiment. Taco Stuffed Shells became one of the first real meals I made that felt like an accomplishment. It was easy enough to get right on the first try, and the flavor was anything but boring.
PrintTaco Stuffed Shells: A Flavorful Fusion for Beginner Cooks

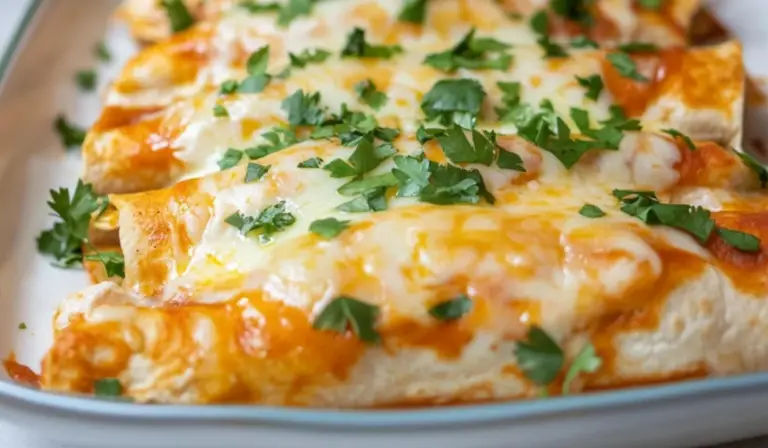
Get ready for a bold twist on two favorites—Taco Stuffed Shells! 🌮🧀 This fusion dish combines tender pasta shells filled with zesty taco-seasoned beef, melty cheese, and a layer of salsa for a meal that’s fun, filling, and perfect for beginners. 🌶️🍝 Easy to assemble and impossible to resist, it’s the ultimate comfort food mashup with a Mexican kick. Great for family dinners or meal prep—every bite is a fiesta! 🎉🍅
- Prep Time: 20 minutes
- Cook Time: 30 minutes
- Total Time: 50 minutes
- Yield: 6 servings 1x
Ingredients
- 1 pound ground beef (or ground chicken as a leaner option)
- 1 cup salsa (choose your preferred heat level)
- 1 packet (1.25 oz) taco seasoning mix
- 1 cup shredded cheddar cheese
- 1 cup shredded Monterey Jack cheese
- 1 can (4 oz) diced green chilies, drained
- 12 ounces jumbo pasta shells (one standard package)
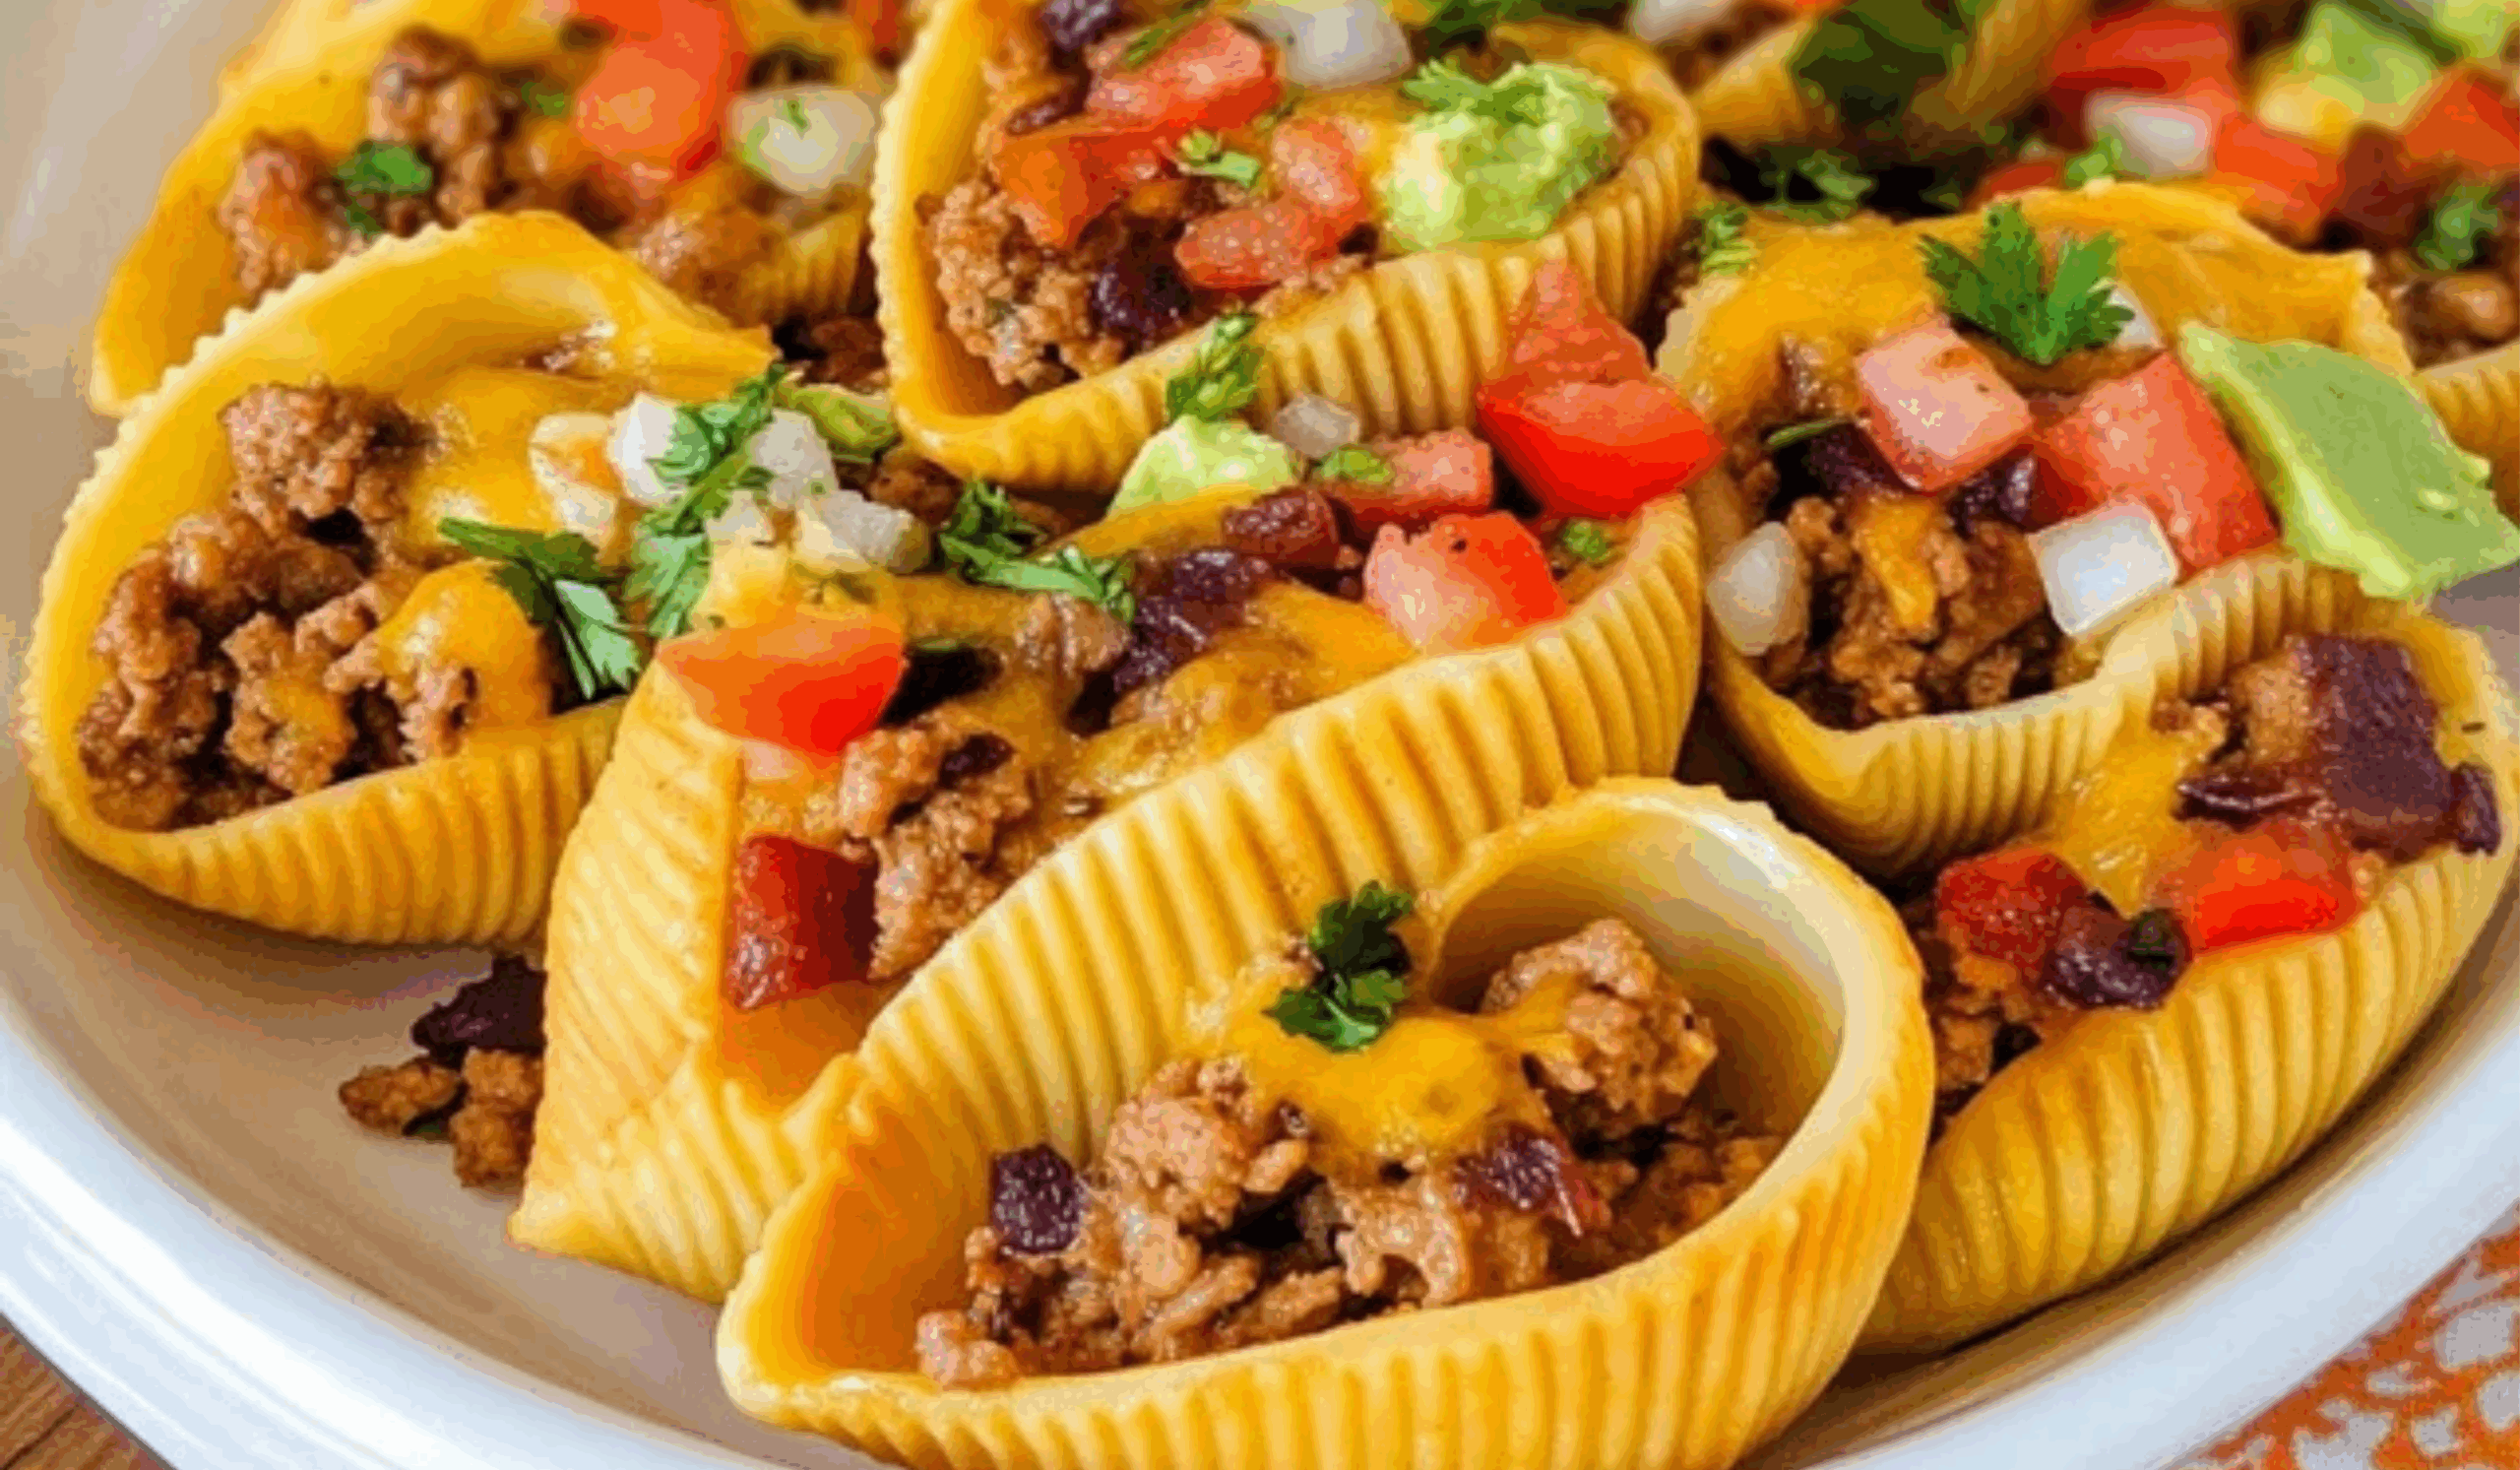
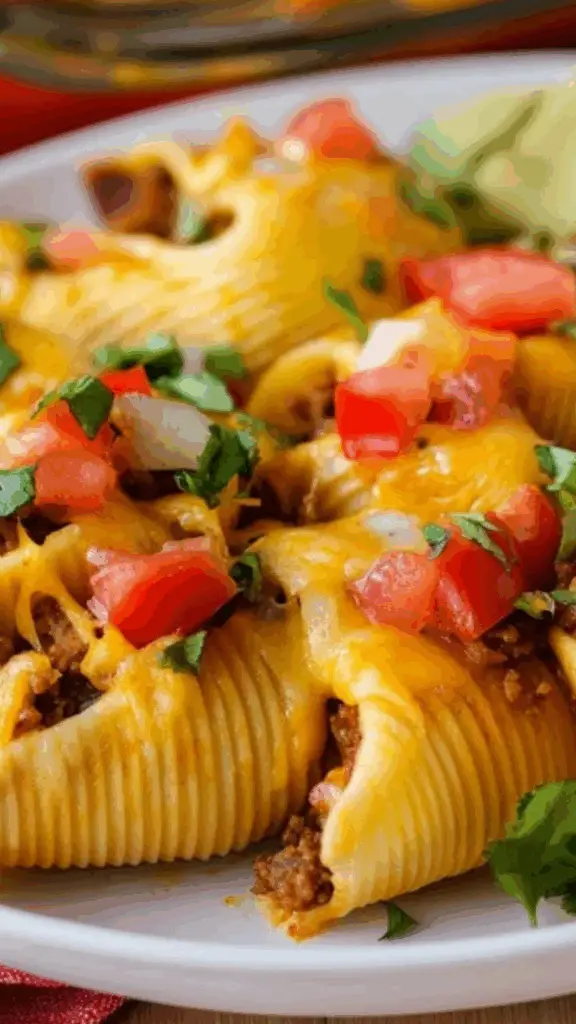
- Optional toppings: chopped fresh tomatoes, diced avocado, sour cream, chopped cilantro
Instructions
- Preheat your oven to 350°F (175°C). Lightly grease a 9×13-inch baking dish and set aside.
- Heat a large skillet over medium heat. Add the ground beef (or ground chicken) and cook, breaking it up with a spatula or spoon. Stir frequently until the meat is fully browned and no longer pink, about 6–8 minutes. If using beef, drain any excess fat. For chicken, draining may not be necessary depending on fat content.
- Add the taco seasoning and salsa to the skillet. Stir well and let the mixture simmer for 2–3 minutes. The liquid should reduce slightly and the flavors will combine.
- Remove the skillet from heat. Stir in ½ cup of the cheddar cheese, ½ cup of the Monterey Jack cheese, and the drained diced green chilies. Mix until the cheese is partially melted and the filling is evenly combined.
- Using a spoon, fill each cooked and cooled pasta shell with a generous amount of the taco meat mixture. Do not overfill—each shell should be plump but able to sit in the baking dish without tipping over.
- Arrange the filled shells in the prepared baking dish in a single layer.
- Sprinkle the remaining cheddar and Monterey Jack cheese evenly over the stuffed shells.
- Cover the baking dish with aluminum foil and bake in the preheated oven for 25 to 30 minutes, or until the filling is heated through and the cheese is fully melted.
- Remove the foil and bake for an additional 5 minutes to lightly brown the cheese topping.
- Remove from the oven and let rest for a few minutes before serving. Add your preferred toppings just before serving.
Notes
Understanding doneness: Ground beef is done when it is evenly browned with no pink remaining and reaches an internal temperature of 160°F. Ground chicken should be white throughout and reach 165°F. Use a meat thermometer for best accuracy, especially when new to cooking.
Pasta handling: Avoid overcooking the shells during boiling. Slightly undercooked (al dente) shells are sturdier and less likely to tear during stuffing and baking. If any shells do tear, don’t worry—just place them torn-side down in the dish and they will still bake well.
Filling tips: If your filling appears too runny, simmer it an extra minute or add a tablespoon of breadcrumbs or crushed tortilla chips to absorb the moisture.
Time savers: You can prepare the meat mixture and cook the pasta shells ahead of time. Store them separately in the refrigerator and assemble just before baking.
Storage tips: Leftovers can be stored in an airtight container in the refrigerator for up to 3 days. Reheat in the oven at 325°F for 15–20 minutes or in the microwave for 1–2 minutes per portion. The stuffed shells can also be frozen before baking. To do this, place the stuffed but unbaked shells in a freezer-safe container, cover tightly, and freeze for up to 2 months. Bake from frozen at 350°F for about 45 minutes.
Ingredient flexibility: If you don’t have green chilies, try using chopped bell peppers or even finely diced cooked zucchini. You can also replace salsa with tomato sauce and a bit of chili powder in a pinch.
This dish is a perfect introduction to cooking for beginners. It uses common pantry items, basic cooking techniques, and allows room for personal touches. The structure of the recipe also teaches foundational skills like browning ground meat, seasoning, stuffing pasta, and oven baking—all of which are key to a range of other recipes. Whether you’re cooking for yourself, for roommates, or for a family, this recipe gives you something delicious and dependable to add to your rotation.
Ingredients and Preparation
This recipe yields six servings, making it ideal for families or for preparing a few meals ahead. You can easily scale the ingredients to make more or fewer portions, and it also reheats well for next-day lunches or dinners.
Ingredients
- 1 pound ground beef (or ground chicken as a leaner option)
- 1 cup salsa (choose your preferred heat level)
- 1 packet (1.25 oz) taco seasoning mix
- 1 cup shredded cheddar cheese
- 1 cup shredded Monterey Jack cheese
- 1 can (4 oz) diced green chilies, drained
- 12 ounces jumbo pasta shells (one standard package)
- Optional toppings: chopped fresh tomatoes, diced avocado, sour cream, chopped cilantro
Preparation Tips
Cook the jumbo pasta shells according to the package instructions until al dente. Do not overcook them, as they will continue to cook in the oven. Once drained, spread the shells out on a large tray or plate to cool slightly so they are easier to handle and fill.
Grate cheese from a block if possible. Pre-shredded cheese contains anti-caking agents that can affect melt quality. For the salsa, a chunky version works well for texture, while a smoother salsa offers a more unified filling. Either works depending on your preference.
If using ground chicken, be mindful that it cooks a bit faster than beef and may require less browning time in the pan.
Step-by-Step Instructions
- Preheat your oven to 350°F (175°C). Lightly grease a 9×13-inch baking dish and set aside.
- Heat a large skillet over medium heat. Add the ground beef (or ground chicken) and cook, breaking it up with a spatula or spoon. Stir frequently until the meat is fully browned and no longer pink, about 6–8 minutes. If using beef, drain any excess fat. For chicken, draining may not be necessary depending on fat content.
- Add the taco seasoning and salsa to the skillet. Stir well and let the mixture simmer for 2–3 minutes. The liquid should reduce slightly and the flavors will combine.
- Remove the skillet from heat. Stir in ½ cup of the cheddar cheese, ½ cup of the Monterey Jack cheese, and the drained diced green chilies. Mix until the cheese is partially melted and the filling is evenly combined.
- Using a spoon, fill each cooked and cooled pasta shell with a generous amount of the taco meat mixture. Do not overfill—each shell should be plump but able to sit in the baking dish without tipping over.
- Arrange the filled shells in the prepared baking dish in a single layer.
- Sprinkle the remaining cheddar and Monterey Jack cheese evenly over the stuffed shells.
- Cover the baking dish with aluminum foil and bake in the preheated oven for 25 to 30 minutes, or until the filling is heated through and the cheese is fully melted.
- Remove the foil and bake for an additional 5 minutes to lightly brown the cheese topping.
- Remove from the oven and let rest for a few minutes before serving. Add your preferred toppings just before serving.
Beginner Tips and Notes
Understanding doneness: Ground beef is done when it is evenly browned with no pink remaining and reaches an internal temperature of 160°F. Ground chicken should be white throughout and reach 165°F. Use a meat thermometer for best accuracy, especially when new to cooking.
Pasta handling: Avoid overcooking the shells during boiling. Slightly undercooked (al dente) shells are sturdier and less likely to tear during stuffing and baking. If any shells do tear, don’t worry—just place them torn-side down in the dish and they will still bake well.
Filling tips: If your filling appears too runny, simmer it an extra minute or add a tablespoon of breadcrumbs or crushed tortilla chips to absorb the moisture.
Time savers: You can prepare the meat mixture and cook the pasta shells ahead of time. Store them separately in the refrigerator and assemble just before baking.
Storage tips: Leftovers can be stored in an airtight container in the refrigerator for up to 3 days. Reheat in the oven at 325°F for 15–20 minutes or in the microwave for 1–2 minutes per portion. The stuffed shells can also be frozen before baking. To do this, place the stuffed but unbaked shells in a freezer-safe container, cover tightly, and freeze for up to 2 months. Bake from frozen at 350°F for about 45 minutes.
Ingredient flexibility: If you don’t have green chilies, try using chopped bell peppers or even finely diced cooked zucchini. You can also replace salsa with tomato sauce and a bit of chili powder in a pinch.
Serving Suggestions
Taco Stuffed Shells are rich and satisfying, but they pair well with fresh or light sides that balance their bold flavor.
Side Dishes
- A simple green salad with a lime vinaigrette or creamy avocado dressing
- Mexican-style rice or seasoned brown rice
- Grilled corn on the cob or corn salad
- Black beans with cumin and garlic
Toppings
- Chopped fresh cilantro or parsley for a fresh contrast
- Sliced green onions for a little bite
- Diced avocado or a small scoop of guacamole
- Sour cream or plain Greek yogurt to cool the heat
- A squeeze of lime juice for acidity
Serving Style Serve the shells directly from the baking dish or arrange them on a platter. These also work well for potlucks or make-ahead weekday meals. They hold up nicely in a lunchbox with a small salad on the side.
Engagement Features
Learning to cook can feel like a challenge, especially when trying to go beyond basic meals. Taco Stuffed Shells are a perfect introduction to building flavor, managing a multi-step recipe, and using the oven with confidence. Each step helps you develop cooking instincts that will apply to dozens of other dishes.
The process teaches how to sauté and season meat, handle pasta gently, and bake a layered dish. It offers flexibility with ingredients and allows space to make the dish your own. If you’re someone who’s unsure in the kitchen, this is a forgiving recipe that still delivers a professional-looking and tasting result.
Once you’ve made it once, try switching it up. Use different cheeses, switch to ground chicken, add vegetables to the filling, or create a spicier version with hot salsa and jalapeños. You’ll find it’s the kind of recipe you can adapt for your own tastes while practicing core cooking techniques.
If you’ve tried this recipe, share your thoughts with fellow new cooks. What worked for you? What did you change? Cooking is often about learning from others, and your experience might be the encouragement someone else needs to try their first homemade meal from scratch.